
Overview
The Remote Control feature lets you view and interact with cloned apps from a web browser. The Remote Control MCP Server extends this by exposing each clone as a standard Model Context Protocol (MCP) endpoint, so AI assistants such as Claude can connect and control your clones directly, without any extra software or scripting.
The Remote Control MCP Server requires the Ultra++ edition of App Cloner and the Remote control extension. In addition, each clone you wish to control must have been created with the Remote control option enabled at clone creation time; this option cannot be added retroactively to existing clones.
Connecting an AI assistant
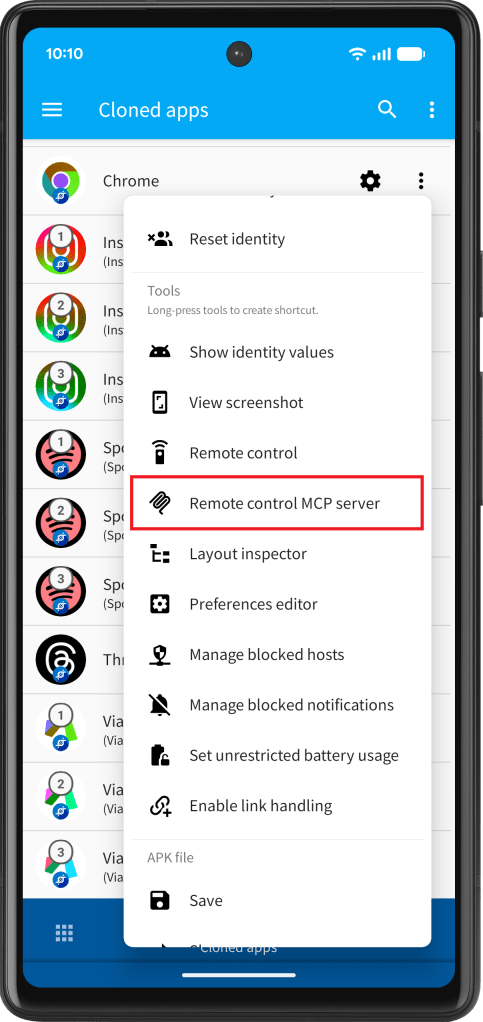
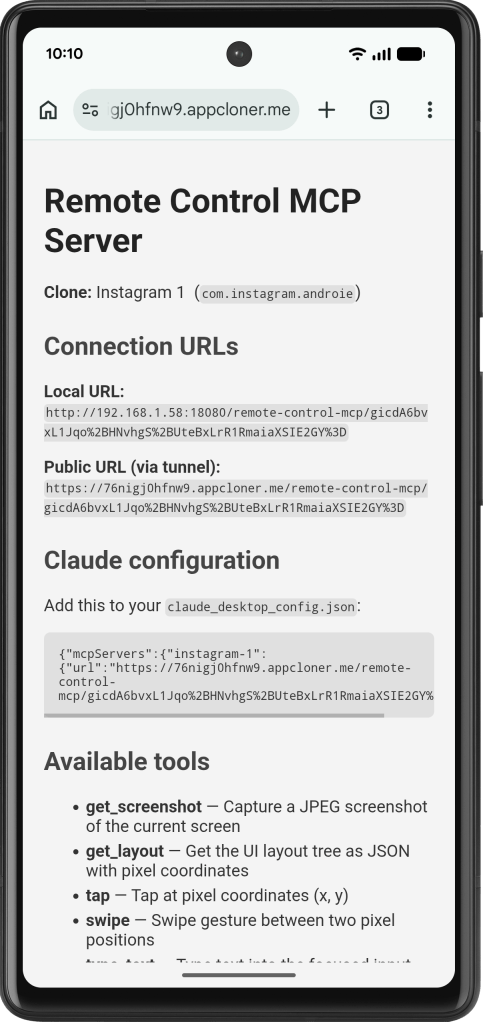
Open App Cloner, go to the Cloned apps tab and select Remote control MCP server from the clone’s context menu. This opens the MCP server page in your browser, showing the connection URL and a ready-to-paste configuration snippet.
You can use the local URL, if the device on the same Wi-Fi network. Alternatively, to connect from a machine outside your local network, e.g. from a cloud-based AI assistant, open the Tunnel manager in App Cloner and start a tunnel. The MCP info page will show the updated public URL automatically.
Claude desktop app
If you are using the Claude desktop app, you can add the provided JSON configuration to claude_desktop_config.json and then restart the app.
Alternatively, go to Customize > Connectors, click the + button (Add connector) and select Add custom connector. You can then enter a name and the URL shown on the MCP server page.
You can add multiple clones as separate connectors, each with its own name and URL.
For the tool permissions, it is recommended to select Always allow for each one.
Available tools
The MCP server exposes seven tools that give an AI assistant full interactive control over the clone.
get_screenshot
Captures the current screen as a JPEG image. The image is returned directly to the AI, which can describe what it sees, read text, detect UI state or confirm that an action worked.
| Parameter | Type | Default | Description |
|---|---|---|---|
resolution | number | 0.5 | Scale factor 0.0–1.0 |
quality | integer | 70 | JPEG quality 1–100 |
Lower values reduce bandwidth and response time. Increase them when fine text or small UI details matter.
get_layout
Returns the complete UI element tree as JSON. Every node includes its class name, resource ID, display text, content description, visibility state and absolute pixel bounds (left, top, right, bottom).
The AI can use this to locate elements precisely without relying on screenshots and it works reliably across app updates.
The root nodes represent top-level windows or dialogs. If the app shows both its main activity and a popup dialog, the JSON will contain two root nodes. Each root node also contains its width, height and density DPI value.
| Parameter | Type | Default | Description |
|---|---|---|---|
include_hidden_views | boolean | false | Include views that are invisible or have zero size |
use_accessibility_tree | boolean | false | Use the accessibility tree instead of the view tree (recommended for apps built with Jetpack Compose) |
tap
Simulates a finger tap at pixel coordinates.
| Parameter | Type | Default | Description |
|---|---|---|---|
x (required) | integer | — | X coordinate in screen pixels |
y (required) | integer | — | Y coordinate in screen pixels |
To tap a UI element found with get_layout, calculate its center: x = (left + right) / 2, y = (top + bottom) / 2.
swipe
Simulates a swipe gesture. Use this to scroll lists, dismiss cards, open navigation drawers and so on.
| Parameter | Type | Default | Description |
|---|---|---|---|
start_x (required) | integer | — | Start X in screen pixels |
start_y (required) | integer | — | Start Y in screen pixels |
end_x (required) | integer | — | End X in screen pixels |
end_y (required) | integer | — | End Y in screen pixels |
duration_ms | integer | 300 | Gesture duration in milliseconds |
type_text
Types text into the currently focused input field. Tap the field first to focus it, then call this tool. Upper-case letters and characters that require Shift are handled automatically.
| Parameter | Type | Default | Description |
|---|---|---|---|
text (required) | string | — | Text to type |
press_key
Sends a single key event using standard DOM key names.
| Parameter | Type | Default | Description |
|---|---|---|---|
key (required) | string | — | DOM key name: Enter, Backspace, Tab, Escape, ArrowUp, ArrowDown, ArrowLeft, ArrowRight, Home, End, Delete |
code | string | same as key | DOM code name |
press_back
Presses the Android back button. No parameters.
Typical automation workflow
- Call get_layout to inspect the current screen.
- Locate the target element by its
text,id, orclass. - Compute its center:
x = (left + right) / 2,y = (top + bottom) / 2. - Call tap with those coordinates.
- Call type_text to enter text; use press_key with
"Enter"to confirm. - Call get_screenshot to verify the result visually.
Repeat from step 1 as needed.

You must be logged in to post a comment.